Deploying Prodigy
You can use Prodigy as an individual on your own laptop but you can also choose to run Prodigy such that you can annotate data with a team. In those scenarios you may want to deploy Prodigy as a web service. Prodigy, in the end, is just a Python program that’s running a FastAPI webapp so there are many ways that you could choose to set this up.
I need to deploy Prodigy on-premise
Prodigy was designed with data privacy at the forefront.For organizations with high security standards, Prodigy can run entirely on-premise rather than the cloud. It never “phones home” to our or any other third-party servers and can even be airgapped from the internet if you need it.
To deploy Prodigy within an on-premise network, we recommend setting up a dedicated server within a corporate network. Prodigy can then be containerized using Docker as we describe below. By encapsulating the app and its dependencies within a self-contained unit or “container”, ensures a consistent and isolated runtime environment, mitigating the risk of vulnerabilities affecting the underlying infrastructure. Containers operate with resource and namespace isolation, minimizing the potential for attacks and enabling fine-grained control over resource allocation.
Email us if you have specific questions about deploying Prodigy within your network.
In this guide we’ll outline some common deployment patterns for Prodigy. Since every cloud platform has some unique features to their deployment stack this document won’t go over every deployment option out there. Instead it will showcase some general patterns and will also mention some things to keep in mind as you deploy.
The Moving Parts
Before diving into deployment strategies, it helps to highlight the different parts that Prodigy needs in order to run.
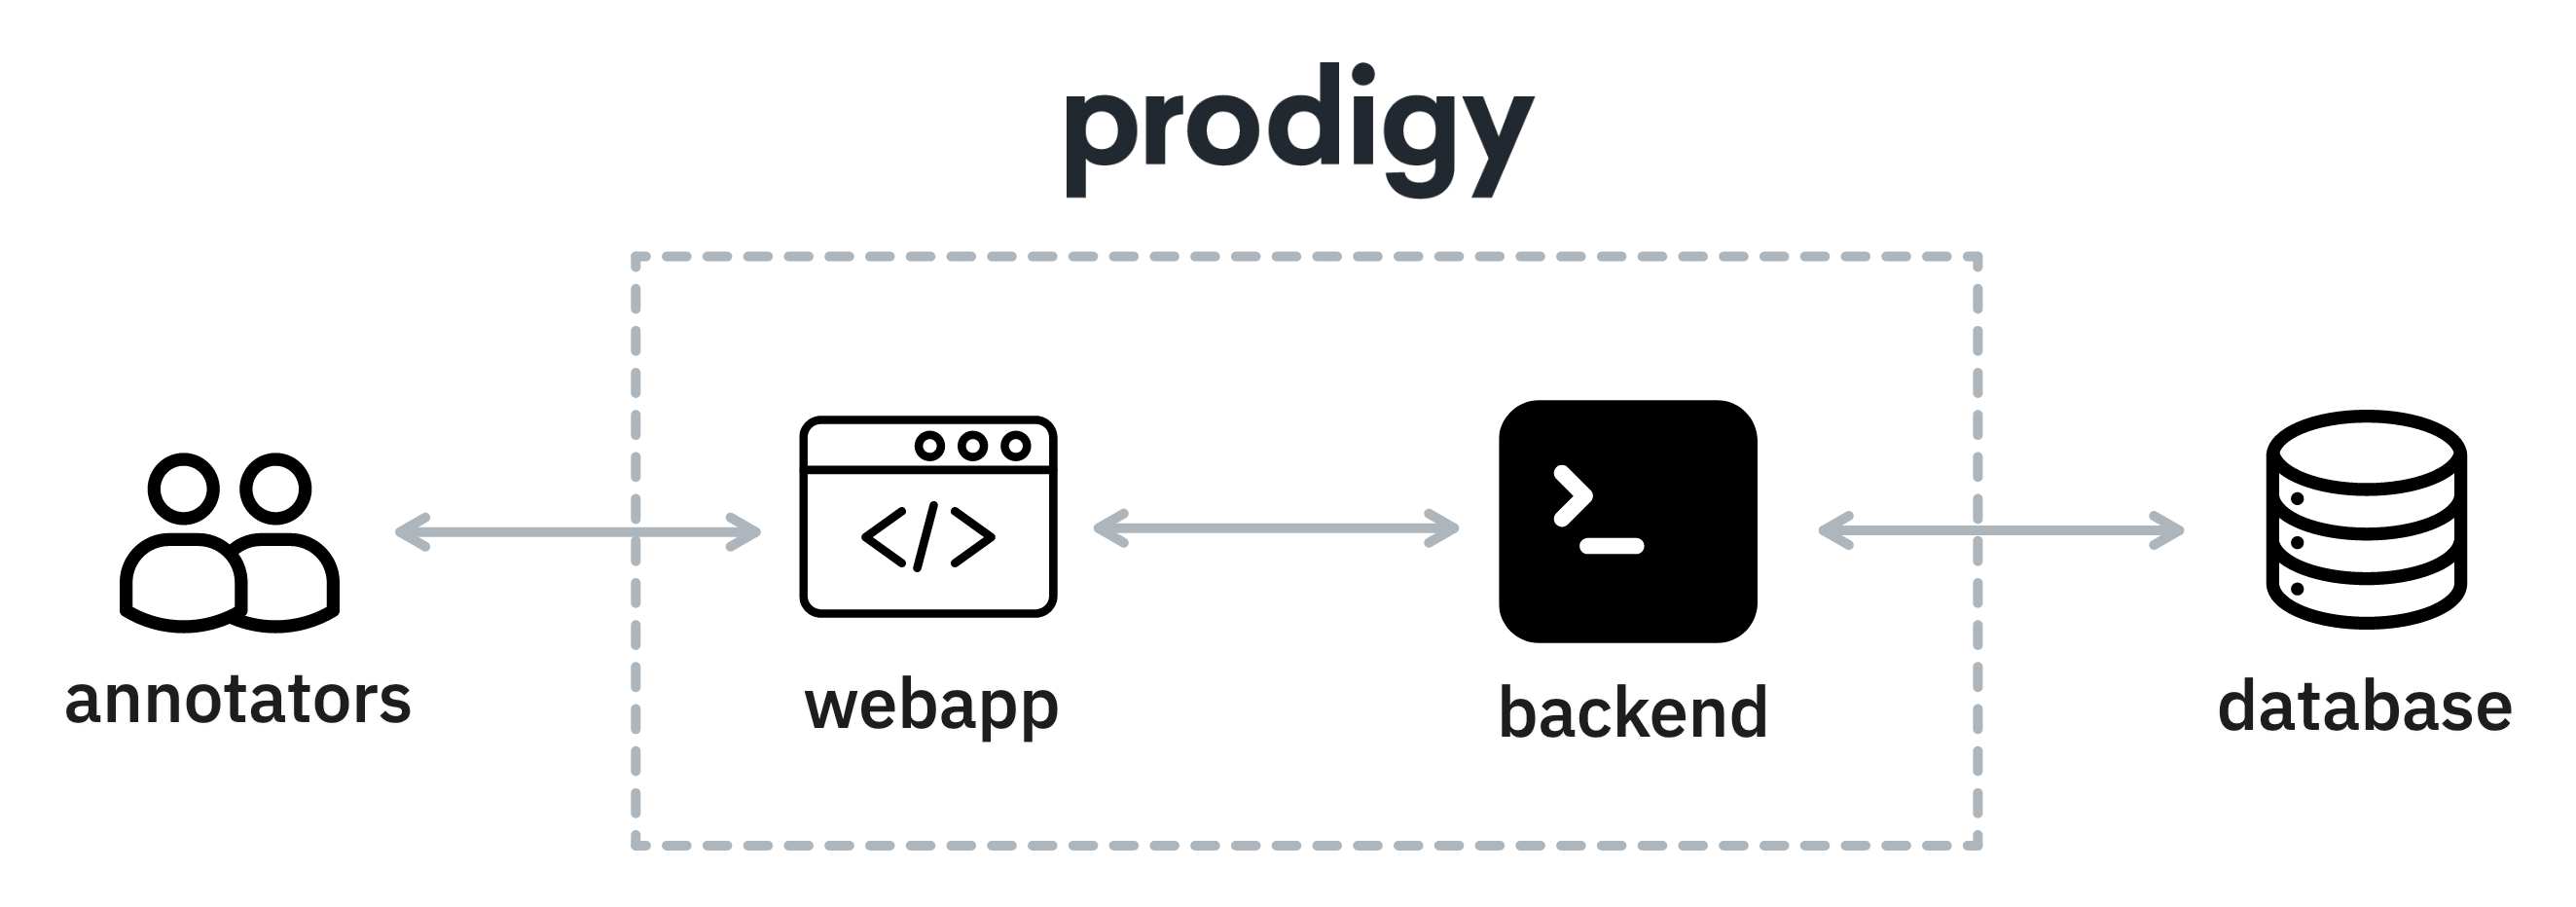
Prodigy starts when you run a recipe. A recipe defines the annotation interface, the name of the dataset to write to in the database as well as an input source.
Then, annotators visit Prodigy via a web interface that is running on top of a FastAPI web application. The annotations that Prodigy receives are stored in a database that is not part of the web application. By default, Prodigy uses SQLite to store annotations in a simple database on disk, but it can also be configured to store annotations in a database running on a server instead.
The database is required to store the annotations but the database is also used to prevent duplicate annotations.
Not a standard webapp
So far, it might sound like Prodigy is “just another webapp”, but there are some pretty big differences between Prodigy and most web applications that are worth highlighting with regards to deployment.
Annotation Data
When you start a Prodigy recipe you’ll need to provide data for annotation. When you run Prodigy on your local machine you’ll typically point it to a file on disk but when you deploy Prodigy externally you will also need to make sure that it can access the data that you’re interested in.
In general, there are three techniques to deal with this.
-
Deploy with data: you could choose to deploy the dataset, as a file, together with Prodigy by uploading it to a VM, by making it part of a
Dockerfileor by providing a script that runs on startup that fetches the data. -
Upload to database: you could alternatively use the
db-inrecipe to upload the dataset to the Prodigy database. All the internal Prodigy recipes can read these datasets by adding thedataset:prefix on the command line. -
Write a custom recipe: you could also choose to write a custom Prodigy recipe, which will allow you to handle any data fetching issues with custom Python code.
Statelessness
Webapps are typically designed to be stateless. All relevant data is stored in the database, which means that when you restart the server you get the exact same app. This is exactly what you’d want for a “normal” webapp because it means that you can choose to scale the webapp horizontally across different workers.
Prodigy differs here though and may not be stateless depending on the setup that you’re running.

In particular, you should be aware of:
-
Active Learning: if you are using active learning techniques as part of your annotation process then Prodigy will update a machine learning pipeline as new annotations come in. If you deploy Prodigy across multiple workers then the annotations will only influence the machine learning pipeline that’s in memory of that machine.
-
Task Router: a user may annotate with a sesson name by providing
/?session=to the URL. This allows Prodigy to add a session for the user, which will provide extra information in the database. These sessions will each have their own queue of tasks but may also influence the task router, which decides which user annotates each example. If you deploy Prodigy across multiple workers then the task router may not be aware of all the sessions on all the machines. -
Custom Recipes: Prodigy allows you to write custom recipes in Python. This gives a lot of flexibility, but if the Python code stores a lot of relevant information in memory then this will also not be shared across workers. This typically happens when users use the
update-callback to update their own machine learning models, but can generally occur anywhere in the Python code.
If the aforementioned items apply to your recipe then you may not want to deploy it to a cloud functions service, like Google Cloud Run, where instances may shut down when they’re not used. You may also want to be careful when you deploy it to an autoscaling environment and make sure that it never gets scaled to multiple compute resources, because some of the aforementioned state won’t be shared between instances.
Deployment on a Local Machine
Sometime you only need to have an annotation interface for a few hours, like when you’re running a small annotation workshop. In these situations it may just be more pragmatic to host Prodigy on your laptop and to not worry about a deployment. Services like ngrok even make it easy to share a local service over a public URL which you can share with your team.
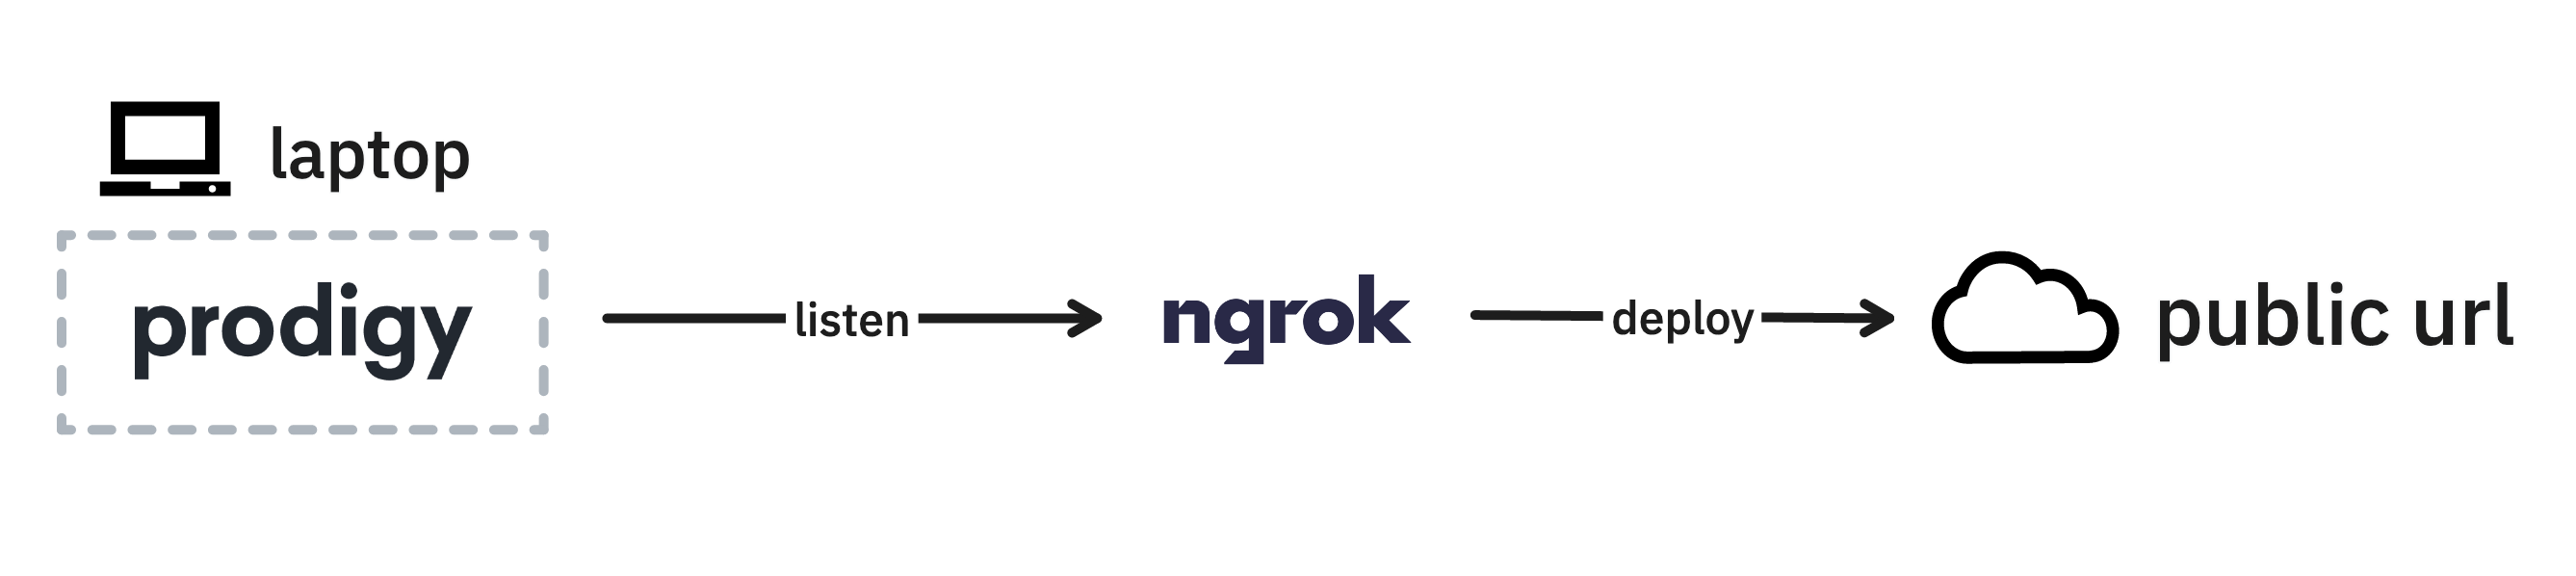
After installing ngrok and setting it up, you can run Prodigy as you would
normally (assuming port 8080) and open a new terminal with the following command
to expose the annotation interface via a public URL.
ngrok http 8080Deploying to a group via your laptop also makes it easy to iterate and make quick changes as feedback comes in, which can also be great for early phases in a project.
Deployment on a Virtual Machine
If you need Prodigy to be running for a longer period of time then you may choose to rent a VM from a cloud provider and to run Prodigy as a webapp from there. Running Prodigy on a VM has a lot of benefits too. One key benefit is that you can keep using sqlite as your database, which means that you won’t need to run a database alongside of Prodigy. But it also means that you can easily SSH into the machine to make changes on the fly.
Running Prodigy on a VM is very similar to running it locally. But if you deploy to a VM then there are a few extra things to keep in mind.
Backups
If you’re running a database on your VM then you’ll want to make sure that you’re running regular backups too. You could do this manually, but it’s preferably to run this via a scheduler, like CRON.
If you use sqlite as your Prodigy database then you can run the backup command
directly from the commandline while Prodigy is still running.
sqlite3 ~/.prodigy/prodigy.db '.backup /path/to/backup'From here you can compress the backup and send it to another storage provider. For a detailed guide on how to back up sqlite, we recommend this guide.
SSH
A benefit of running Prodigy on VM is that you can easily SSH in to make changes. To make this even more convenient you can setup VSCode to run on your VM over SSH. This way you’ll be able to work with Prodigy as if you’re working locally, while also being able to click and drag files via the user interface. If you appreciate a refresher on SSH keys, you may appreciate this calmcode tutorial.
Deployment in a Docker Container
You may also choose to deploy Prodigy via Docker. Docker is a common technique to deploy code on many cloud providers. This part of the guide assumes that you’re already familiar with Docker and will highlight some things to keep in mind.
Building a Dockerfile
Instead of using a VM, you my also choose to deploy using Docker. Docker allows
you to build “containers”, which represent a bundled service that contains
everything you need to run. To build such containers, you’ll need to write a
Dockerfile that tells Docker what needs to be installed. This section assumes
that you’re allready familiar with writing a Dockerfile, but will mention a few
things to look out for.
Dockerfile
There are a few points worth highlighting in this Dockerfile.
-
This Dockerfile assumes the presence of a
.envfile that contains all the required environment variables required to run and build the container. This.envfile contains secrets that should not be pushed to a git repository which is why it’s typically part of a.gitignorefile in your project. Sometimes cloud providers allow you to inject these secrets as environment variables at runtime too. However, in the case of Prodigy, you’ll need thePRODIGY_KEYas _buildtime* in order topip installit. Most of the time, that means it’s more convenient to build the container locally and to push it to a registry. -
If you’re Mac with a new M1 chip then you may be building the docker container on a different architecture than the runtime of your cloud provider. That’s why it may be useful to pass
--platform=linux/amd64to theFROMstatement. -
This Dockerfile uses
EXPOSE 8080to expose the required port manually. Typically port 8080 is used, but this tends to vary per cloud provider. It can also be an option to use refer to an environment variable from the cloud provider instead of exposing it manually. -
There are a few environment variables related to Prodigy that are set manually in the Dockerfile. These ensure that Prodigy runs with basic logging but also ensures that there’s basic password protect in place and that users are defined upfront for annotation. These environment variables don’t describe secrets, so it’s fine to set them directly in the Dockerfile.
-
The
COPY . .line will copy all the files from your project folder into the Docker container. This typically includes any custom recipes you’ve written as well as theprodigy.jsonconfiguration file. However, files described in your.dockerignorewill be skipped. This ignore file allows you to configure which files should never get copied in, in an attempt to keep the container lightweight. We recommend adding any virtualenv environment folders as well as datasets that should not be annotated. Also note that a generalCOPY . .command should always be done after steps that involve installation to make sure that the Docker chaching mechanism prevents extra work. -
We’re referring to a
run.shfile at the end of the Dockerfile that includes a few scripts that should run at startup. You typically don’t just want to run your Prodigy recipe, but you may also want to run a script that fetches the data to annotate. It might also make sense to runprodigy stats, again to get some useful logs to appear for debugging.
When you’re working on your own Prodigy deployment you’ll likely end up not using this exact example but rather creating a variant. Different cloud providers really have different preferences, especially when it comes to integrating with services for authentication and data retreival.
Example: Docker on Digital Ocean
This section will highlight an example Docker deployment of Prodigy on the Digital Ocean Apps platform. To get this to work we’ll also provision a Postgres database to store the annotations.
Setting up Postgres
Like many cloud providers, Digital Ocean provides managed hosting of Postgres databases. When you use the GUI to set up a lightweight instance, you’ll end up with a screen that looks like this:
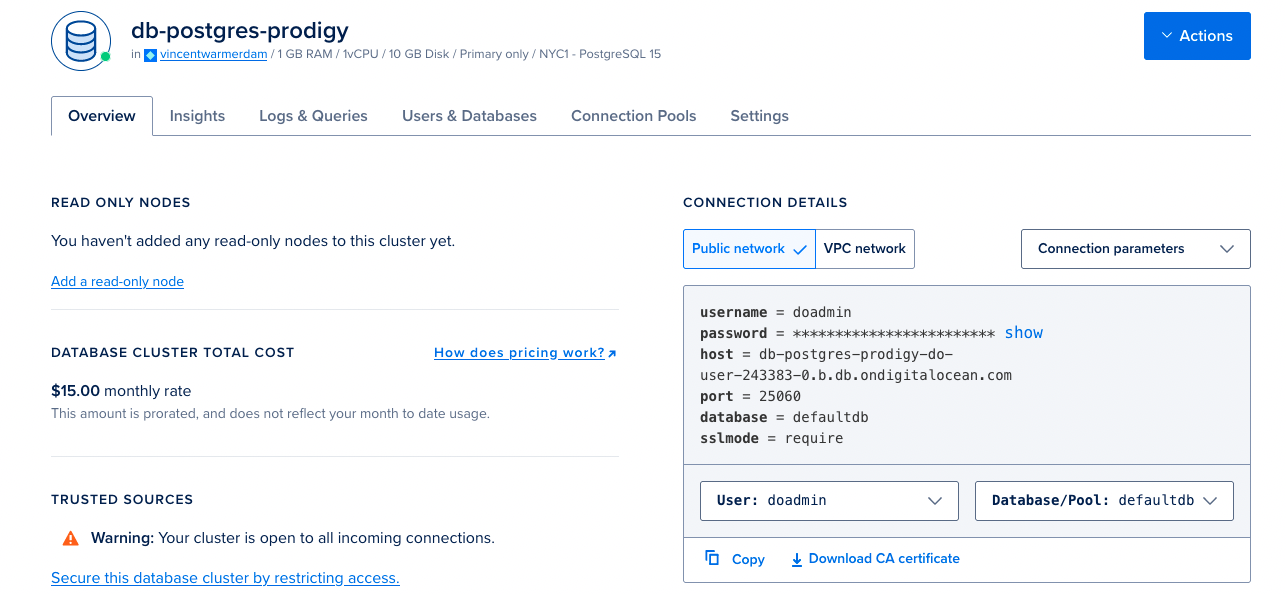
The connection details to the right are important because we’ll need this
information in our prodigy.json file to
connect to the database from the docker
container.
In this example, the prodigy.json file would look like this:
{ "db": "postgresql", "host": "0.0.0.0", "port": 8080, "db_settings": { "postgresql": { "host": "db-postgres-prodigy-do-user-243383-0.b.db.ondigitalocean.com", "dbname": "defaultdb", "user": "doadmin", "password": "******", "port": 25060 } }}Given that you’ve now set up a postgres database you can also connect to it
locally to verify that it works by updating your local prodigy.json file. Just
be aware that this database is a “production” database and you want to make sure
that you don’t accidentally upload local annotations meant for debugging.
Setting up App Platform
After setting up the database, and confirming that you can connect to it
locally, it’s now time to set up a Docker for deployment. This guide will re-use
the Dockerfile mentioned earlier while also provisioning a few
extra files.
First, you’ll need to provide a requirements.txt file that contains the
dependency for Postgres. In your own deployment you may add extra dependencies
here but in this case you’ll also add a
python-dotenv dependency to help read
the environment variables as well as
psycopg dependency to connect to postgres.
requirements.txt
Next, there’s the .env file that contains all the secrets that we don’t want
to include in our git repository.
.env
The next step will make sure that these environment variables are available as
parameters in prodigy.json at runtime. For that, you could write a
mkconfig.py script that takes care of everything.
mkconfig.py
This script can be made part of the run.sh startup script at the end of the
Dockerfile.
run.sh
This script is run on startup of the container. Besides setting the environment
variables it will also make sure that there’s data available for annotation and
it will also run the prodigy stats command to show some extra logs that could
be useful during debugging. At the end, it runs the Prodigy recipe.
To build this container locally, you can run:
docker build -t prodigy-container .This will build the container and also tag it with the prodigy-container name.
Deploying
To deploy this container as a service, we’ll first need to push the container to the container registry of the cloud provider.

This is a common pattern. Everytime a new container is pushed, the registry is updated which can trigger a new deployment. You can do this in an automated fashion by using Github actions or Gitlab CI, but you can also do this manually from your laptop. In this guide we’ll proceed to do this manually.
In order to push to a registry, you need to make sure that it exist first. You
can do this by using the command line interface provided by the cloud provider.
If you want to learn how to set up the doctl tool to interface with Digital
Ocean you can check the documentation page
here. More
information about their container registry and be found
here.
One comment about Docker registries and pricing.
The steps below will create a Docker registry hosted by a cloud provider. In this case Digital Ccean will offer one registry with a 500Mb limit for free but you will have to pay if you plan to exceed this limit. You can choose to manually remove containers from the user interface if you exceed the quota, but once you start pushing many containers it may be more pragmatic to pay for the hosting service.
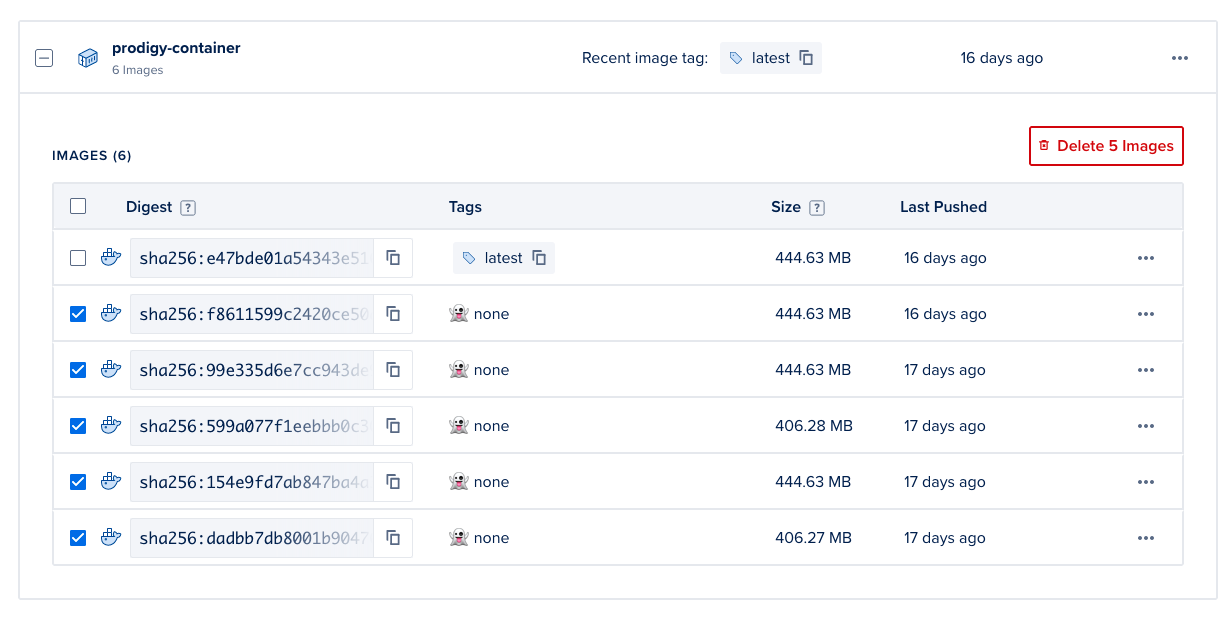
Different cloud providers will have different hosting fees for containers, more details on pricing for registries on Digital Ocean can be found here.
# Assuming doctl is installed, make sure you're authenticateddoctl auth init# Next, setup a container registry called `annotation`doctl registry logindoctl registry create [unique-registry-name]Make sure you remember the [unique-registry-name], you’ll need it in the next
step where we push the container to the registry.
# Note that -t adds the `prodigy-container` tag to the built imagedocker build --progress=plain -t prodigy-container .# We're tagging the `prodigy-container` to also go to the cloud registry# Note that `annotation` corresponds to the registry name we made earlierdocker tag prodigy-container registry.digitalocean.com/[unique-registry-name]/prodigy-container# Push the container to the registrydocker push registry.digitalocean.com/[unique-registry-name]/prodigy-containerEvery cloud provider typically has their own command line interface as well as their own preferred way of dealing with Docker containers. So this command, as well as the authentication steps required, will differ from your provider. But the pattern of pushing a container to a registry in order to trigger a new deployment is quite general.
Now that the container is available on the registry, lets connect it to an app. You can do that by clicking the blue “create app” button in the app panel. This will give you an interface that lets you select the registry that we just pushed a container into.
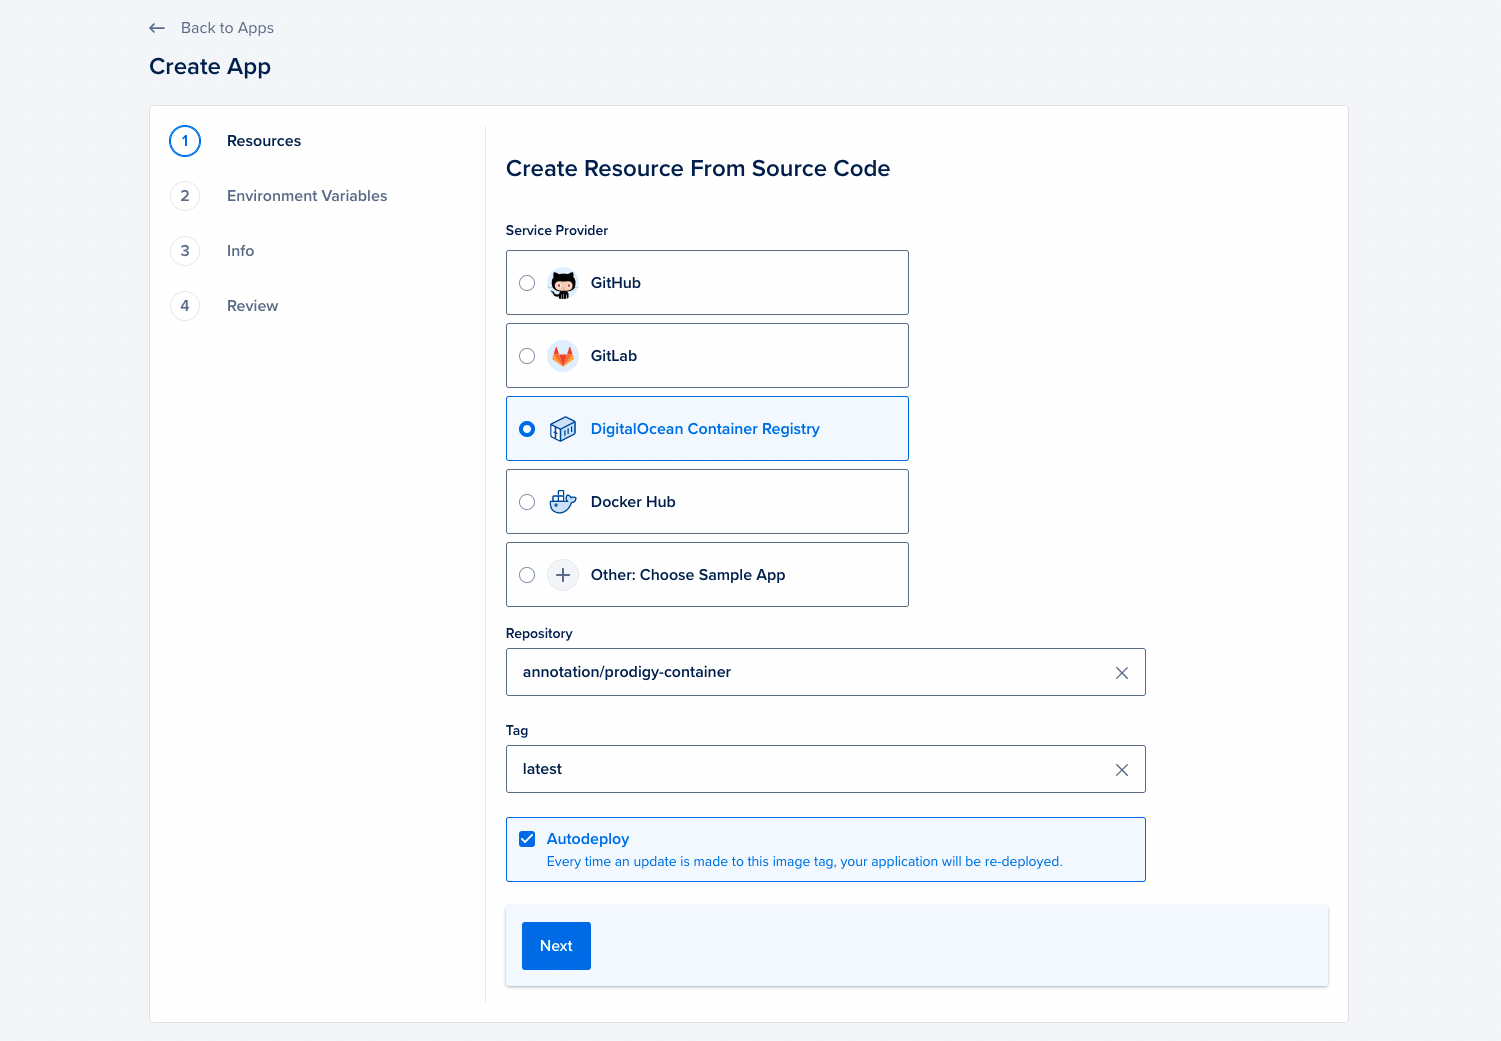
In the next steps of this form you can select the resources to be made available to the app. For tutorial purposes we recommend going with the lightest variant, but if you’re running trained spaCy models you’ll want to pick a variant with more memory.
Environment variables via the cloud provider
Later in the form, you’ll be able to enter environment variables from the digital ocean user interface as well.
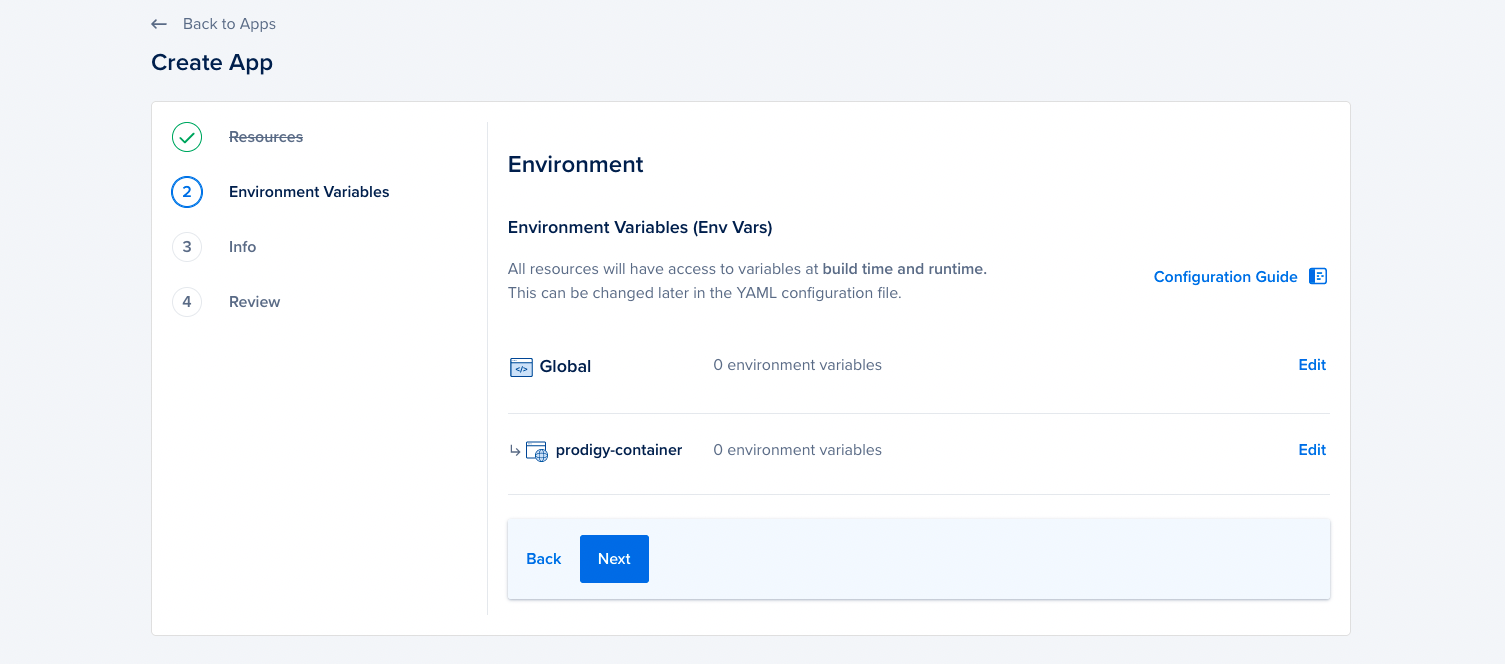
This can be an alternative to setting some of the environment variables in the
Dockerfile. Different cloud providers may provide slightly different
interfaces to configure this, but it can be a valid method of setting variables
too.
When you wrap up the form Digital Ocean will run the built container. They will even provide you with the runtime logs that you can check yourself to see that everything is running as expected.
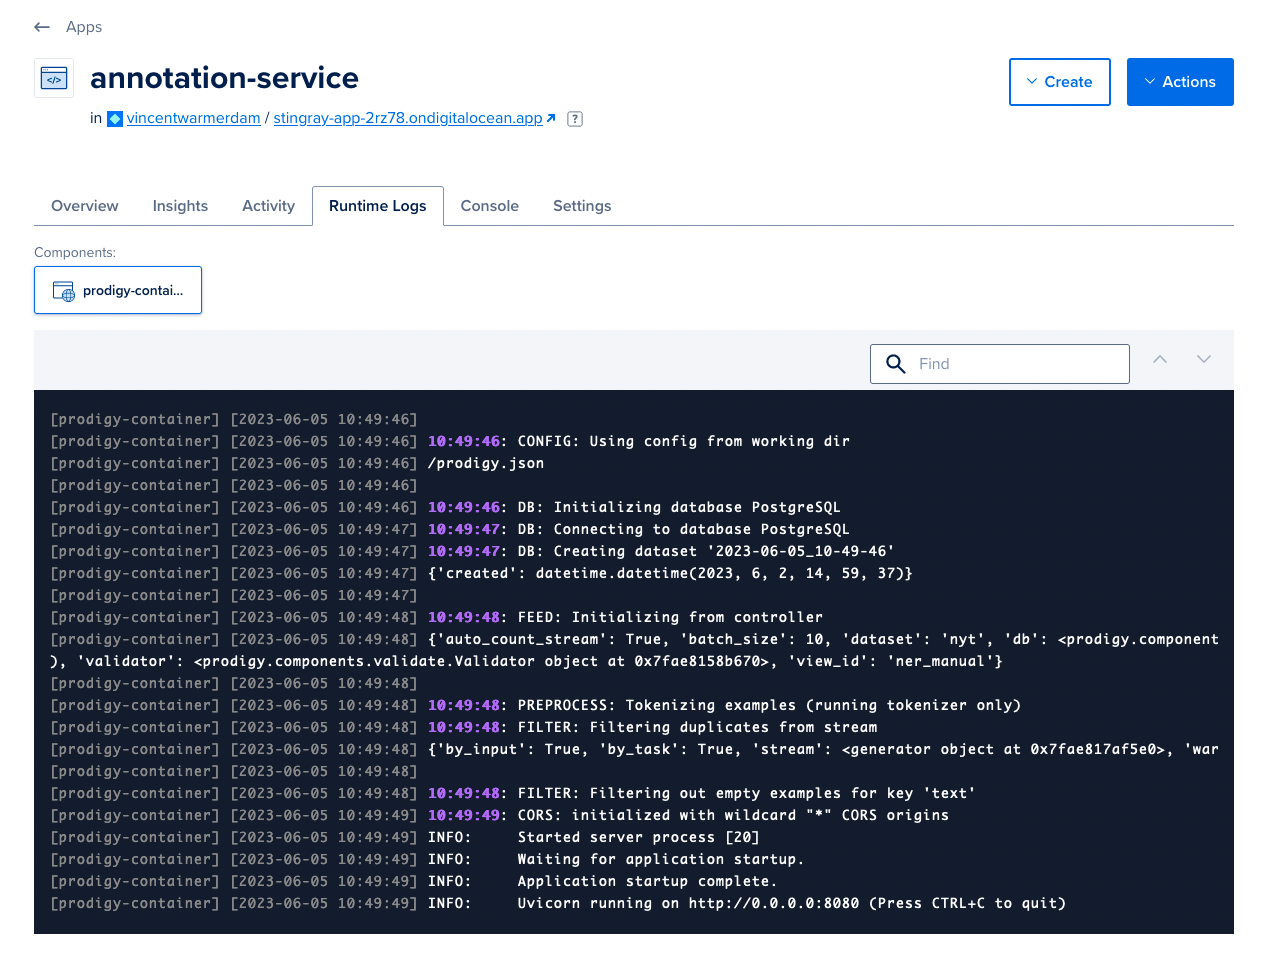
Most importantly the app is now live and can be accessed by following the
".ondigitalocean.app" url provided at the top of the interface. When you click
this link you’ll be presented with a password prompt configured by the
PRODIGY_BASIC_AUTH_USER and PRODIGY_BASIC_AUTH_PASS environment variables.
You’ll also get a familiar warning when you’re not passing a /?session=
session via the url because of the PRODIGY_ALLOWED_SESSIONS environment
variable in the Dockerfile.
Everytime that you push a new version of the container, this app will also update. That means that when you, for example, update the user interface you can rebuild and push to get the new interface to your annotators.
Automating the deployment
At the moment the deployment needs to happen manually from a laptop. But it can be automated using Github Actions to Gitlab CI as well. This way, you may trigger a new deployment of Prodigy every time there is an update to a git repository. To set this up, you’ll want to make sure that the CI provider is aware of the appropriate keys. The main keys to consider are listed below.
-
The Prodigy license key needs to be availabe such that you can use it to populate the
.envfile that allows you to download Prodigy. -
Any relevant keys from your cloud provider will need to be available such that you’re able to push the Docker container to the required registry.
Things to still consider
This guide on Docker deployments omits many topics sake of brevity but there are still a few things to keep in mind with this deployment.
-
The database is currently accepting connections from anywhere, which isn’t a great security practice. Every cloud provider has different security mechanisms to deal with this, but you’ll likely want to the IP adresses can access the data. You’ll likely also want to go for a less guessable username for the database, as
doadminwill be a name that bad actors will try to find. -
The Prodigy web application is currently live on the internet. While there is a basic authentication mechanism in place, it may be preferable to deploy this service in an environment that only your team can access. Setting this up appropriately really depends on your cloud provider as well as your team requirements.
-
Odds are that you get new data to annotate as time moves on. In the current setup, that means that you will have to redeploy the container in order to get the new data to your annotators.
-
As mentioned earlier, your deployment may not be stateless. Even when you write all of the annotations into the database, you may still be dealing with an active learning model that is kept in memory. Everytime you restart the container, the model state may also restart.
-
Prodigy will be part of a larger system. Right now we’re only saving data into a Postgres database but you may also want to export this data on a regular basis so that machine learning models can be trained on top of it. This means that you’ll likely need to make some more integrations with services that can perform batch jobs.
-
If you’re using pre-trained spaCy pipelines then you’ll want to make sure these are available in your container. If you want to use one that’s hosted by spaCy you’ll need to add an extra
RUN python -m spacy download ...line to your Dockerfile, but if it’s a custom pipeline hosted on your own infrastructure you’ll need to perform some more work. -
Cloud providers will typically poll a
healthorhealthzendpoint of your webapp to confirm that it is still up and running. If this endpoint is unresponsive, the cloud provider will typically attempt a restart of the container. Prodigy provides such a health endpoint, but your cloud provider may need to be configured to understand where to find it.